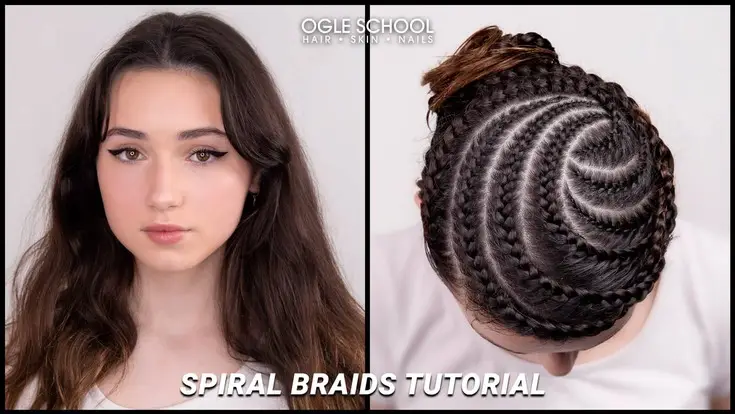
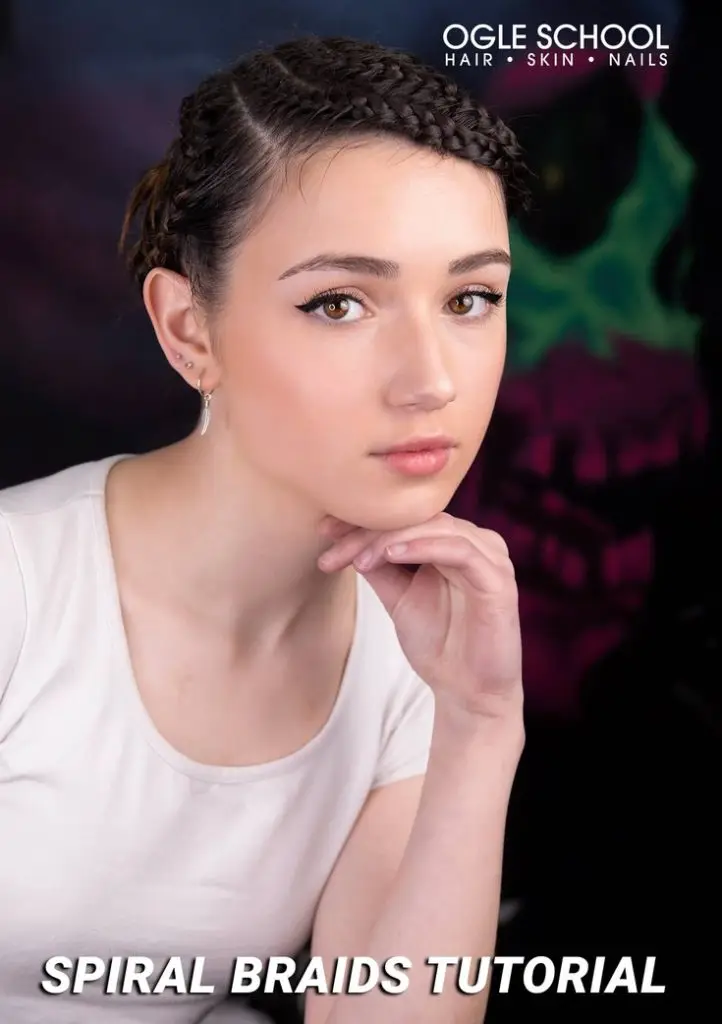
Spiral braids are one of the most technically demanding braid styles - intricate, structured, and eye-catching when executed properly. Our step-by-step tutorial breaks down the full process across 15 steps, including how to section the hair, apply wax, create ascending spiral parts, and finish with a bun. Each braid follows a specific path relative to the others, and our numbered guide makes the sequence easy to follow. At Ogle School, no style is too complex - our cosmetology program gives students the hands-on practice and instructor-guided training to master looks like this.
Achieve this labyrinthian style braid with our step-by-step guide.
The elaborate, multi-directional braid will be head-turning and a fun style for any season.
You’ll need the following materials to get the job done:
Thick and thin clips to hold hair
Hairpins
Shiny wax
Tail comb
Transparent or colored gummies.
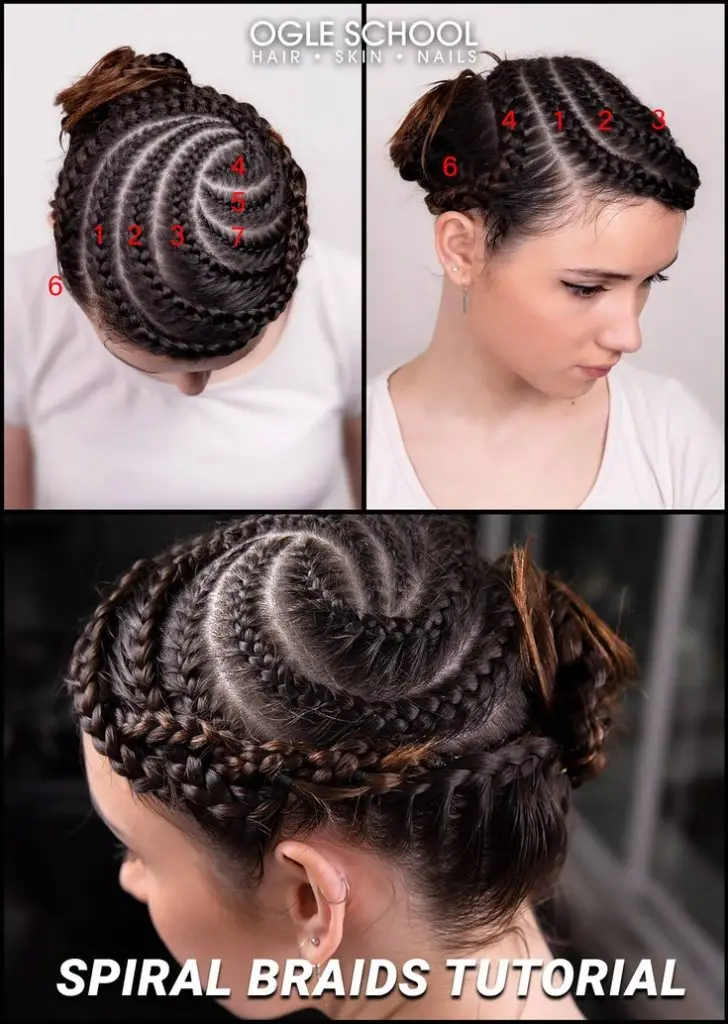
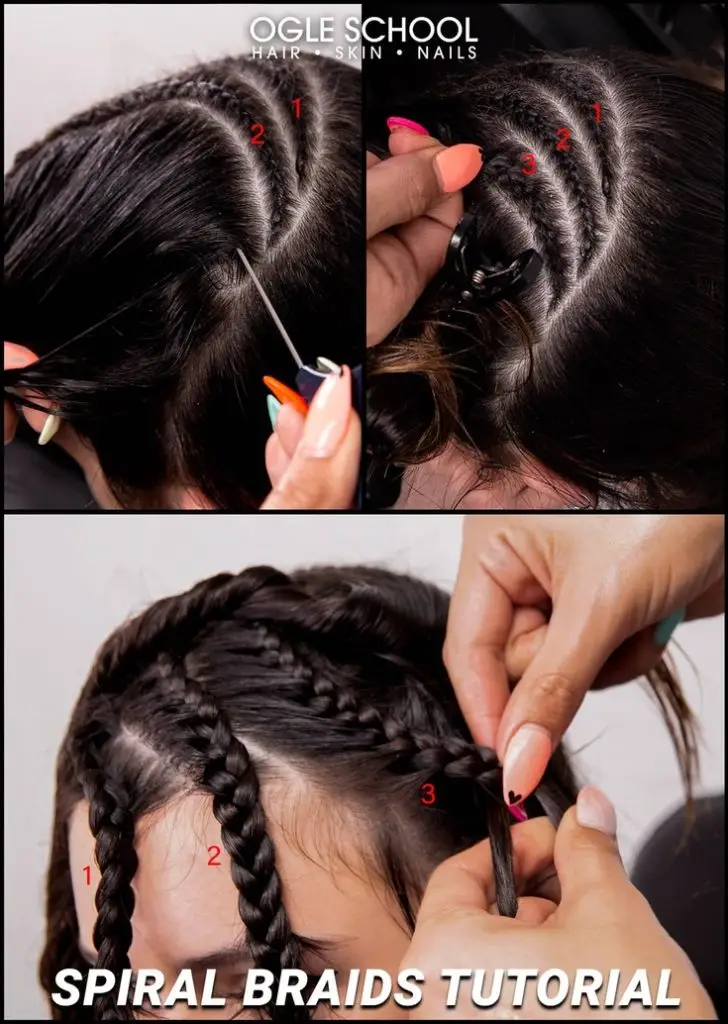
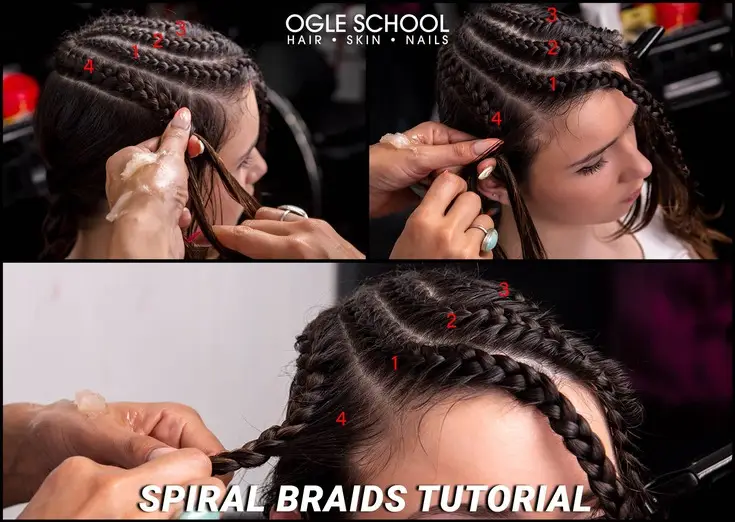
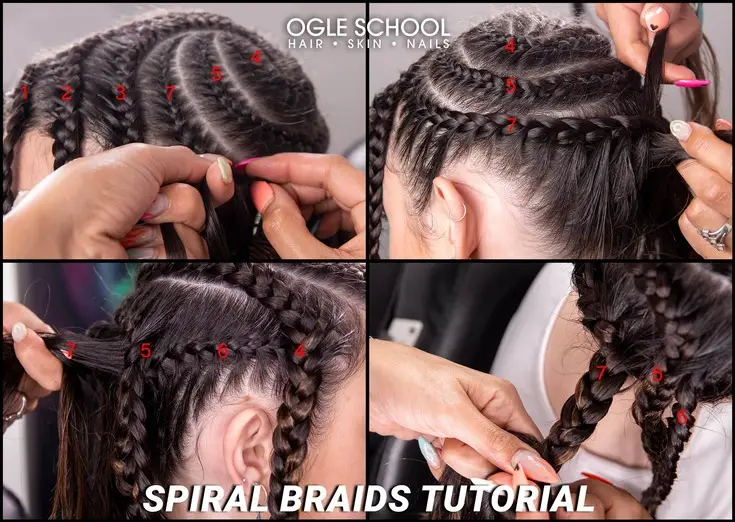
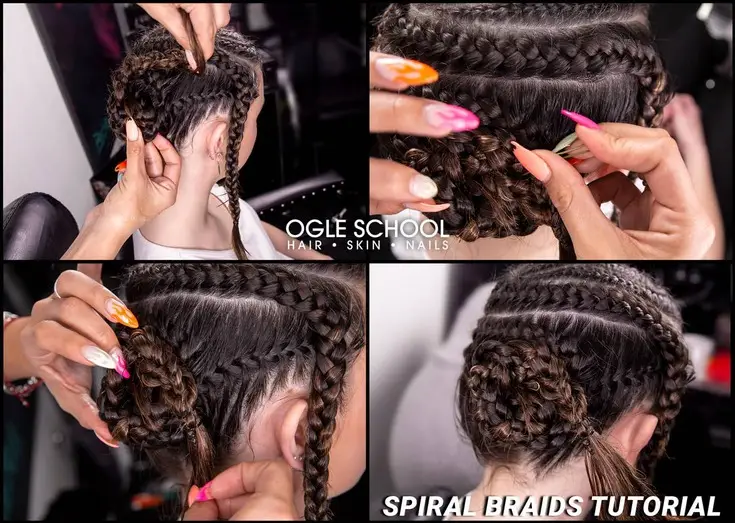
Take note of the hair reference’s front, side, and back. We’ve numbered the braids to make following this tutorial easier.
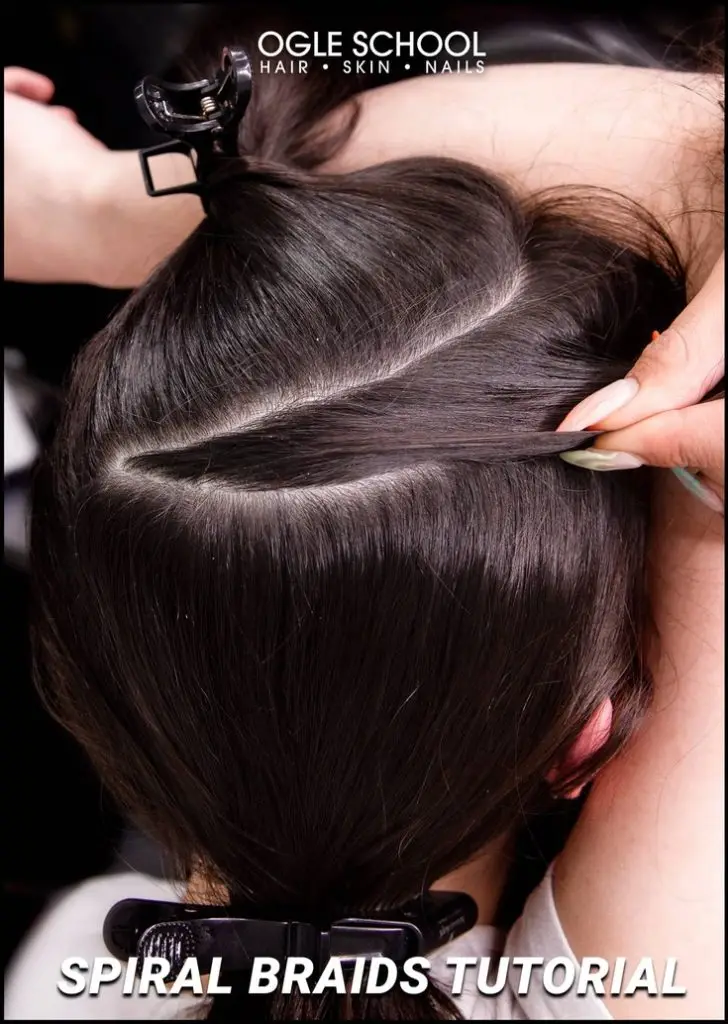
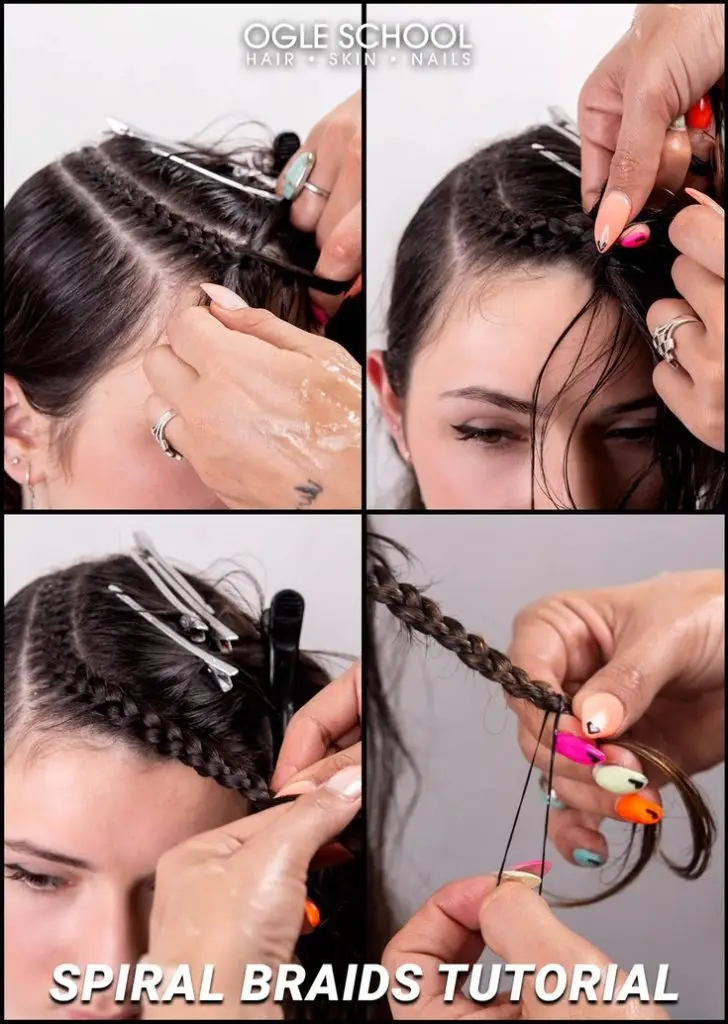
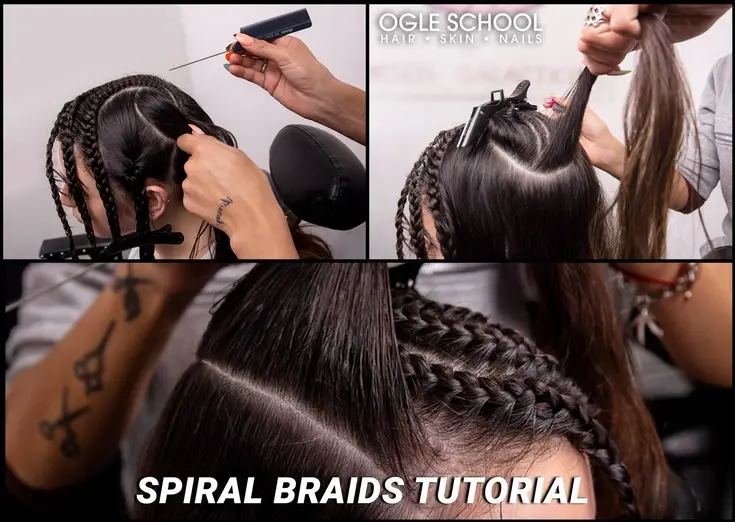
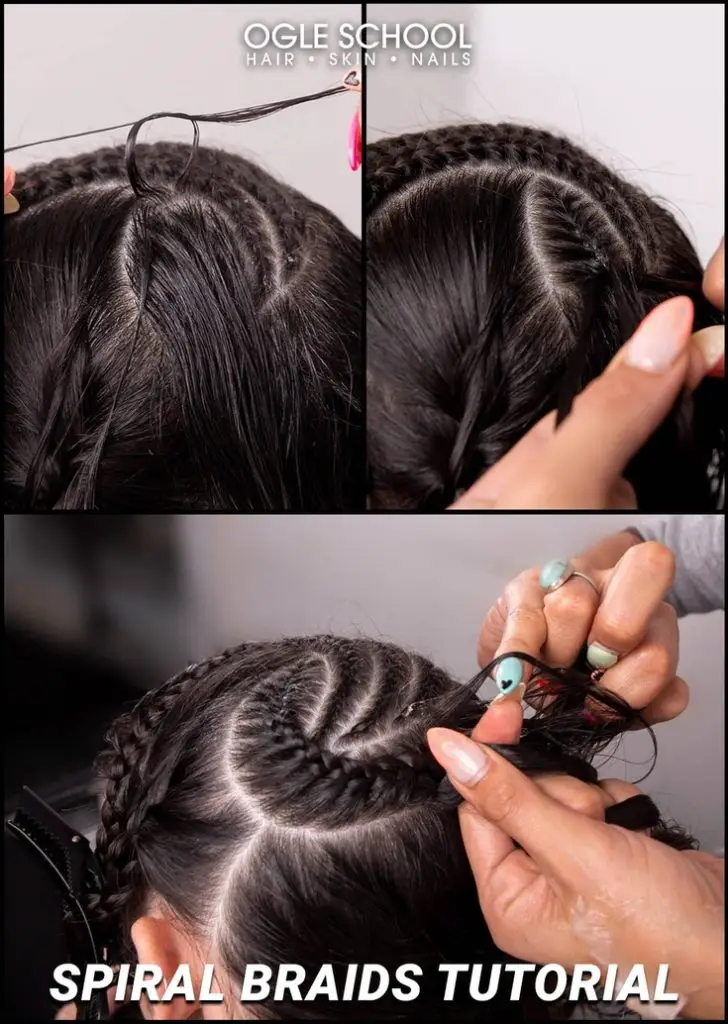
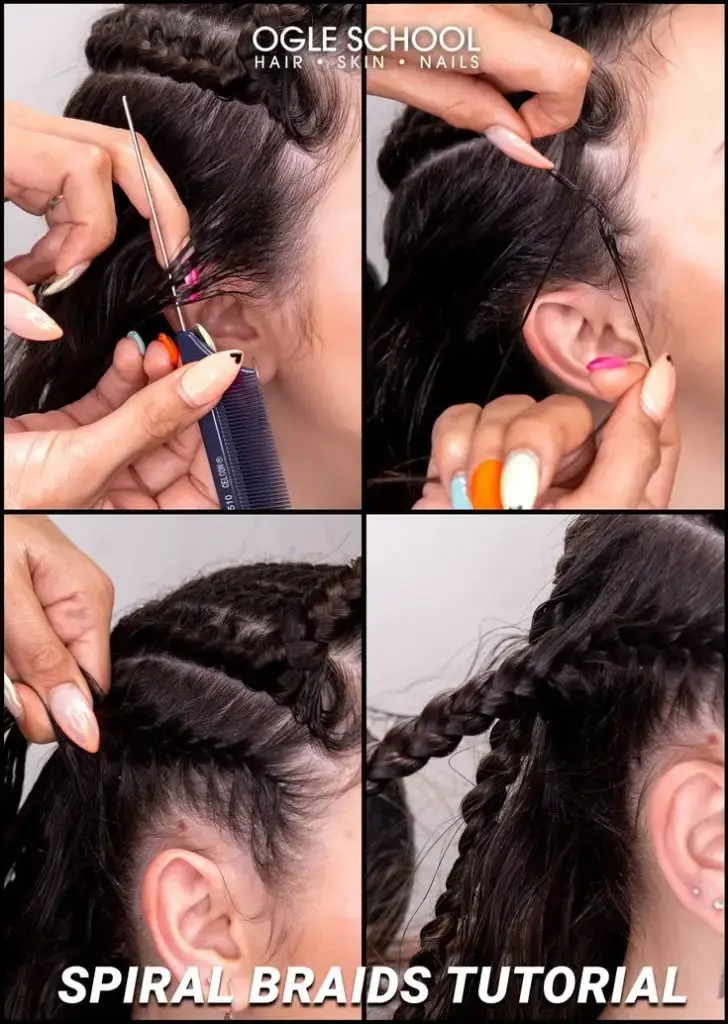
Step One: Divide the hair mid-crown, combing the front half forward and the bottom half of the hair back. Secure the bottom half of the hair with a band. Next, create a new part within that section––the strand will be in an ascending spiral shape.
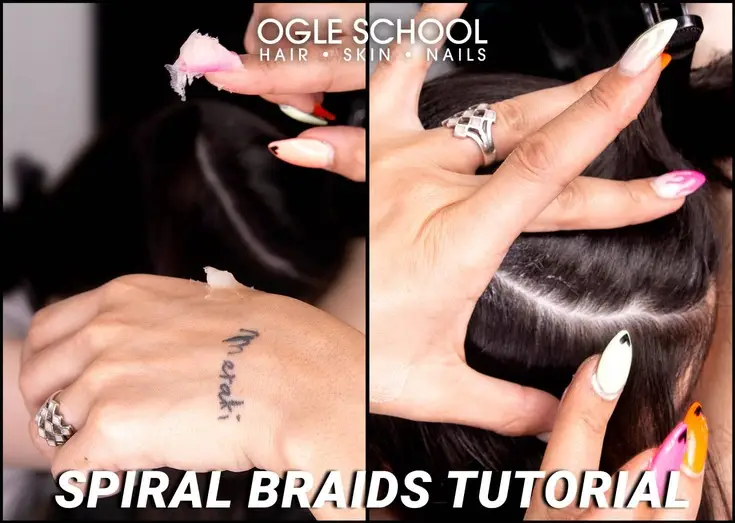
Step Two: Apply wax to both divisions.
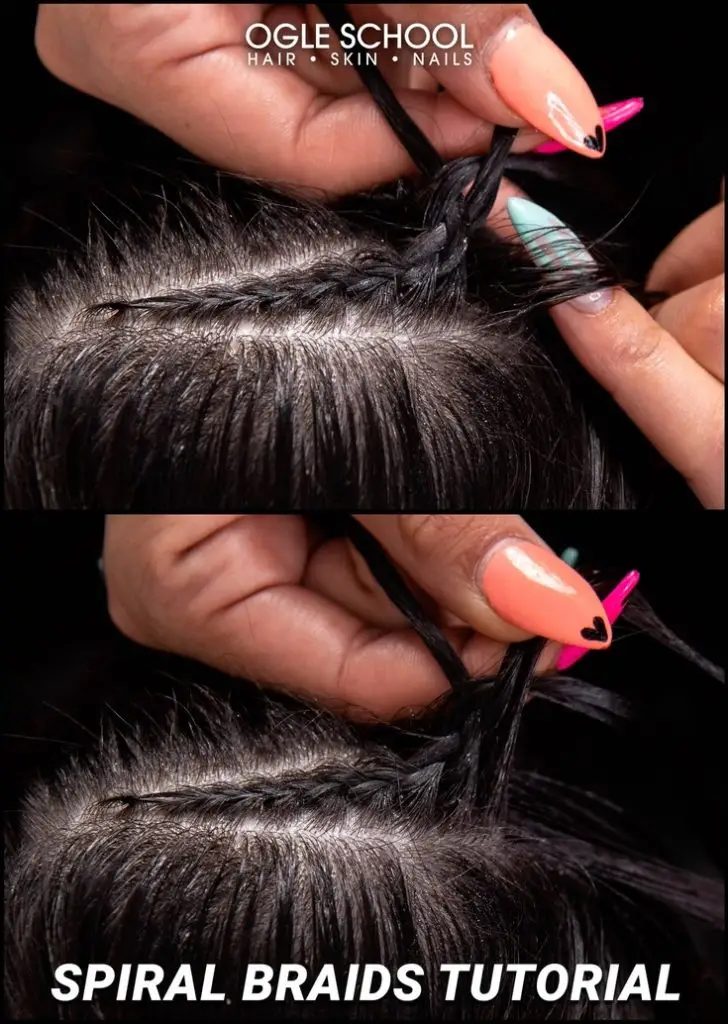
Step Three: Gather two thin strands and tie a knot. Collect the third strand and bring it to the center of the two strands. As you braid, continue gathering more hair each time you pass the hair over the center strand.
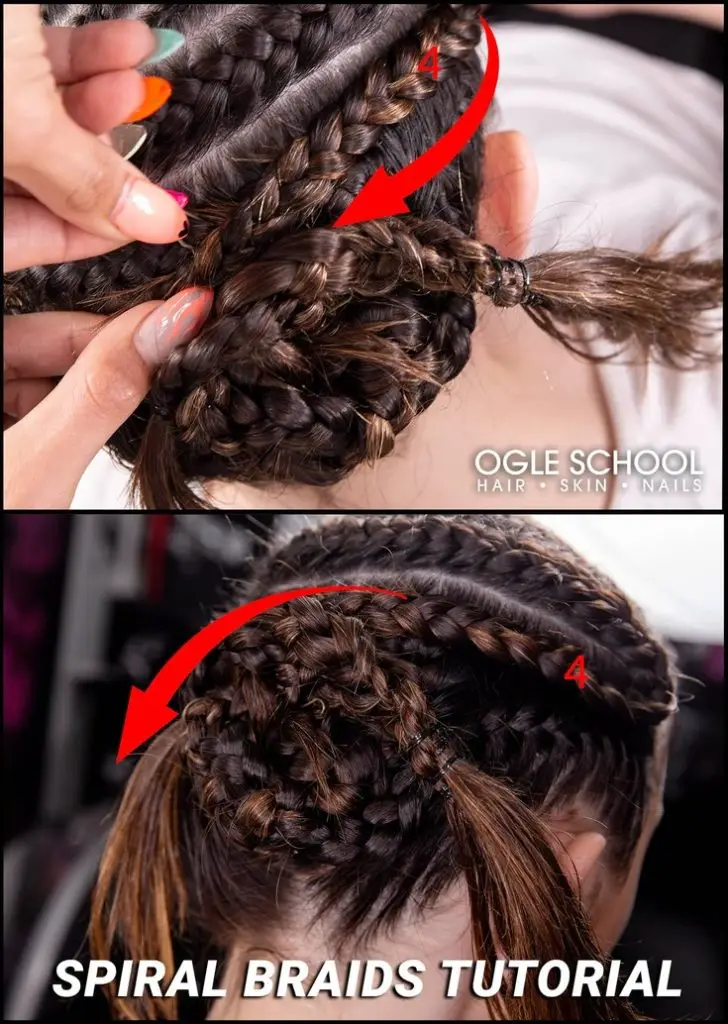
Step Four: As you make your way to the front, collect double the amount of hair only from the left side.
Step Five: Once you reach the forehead’s hairline, continue to braid your hair and allow it to drape over your forehead for now.
Step Six: For the second braid, divide the hair, so it is parallel to the first braid, and leave it 1 cm apart from the first braid, and repeat the technique from step three. At the curve, continue braiding and only collect hair from the left side to create a parallel twist with the first braid.
Step Seven: Make a new part for the third braid and repeat the previous steps.
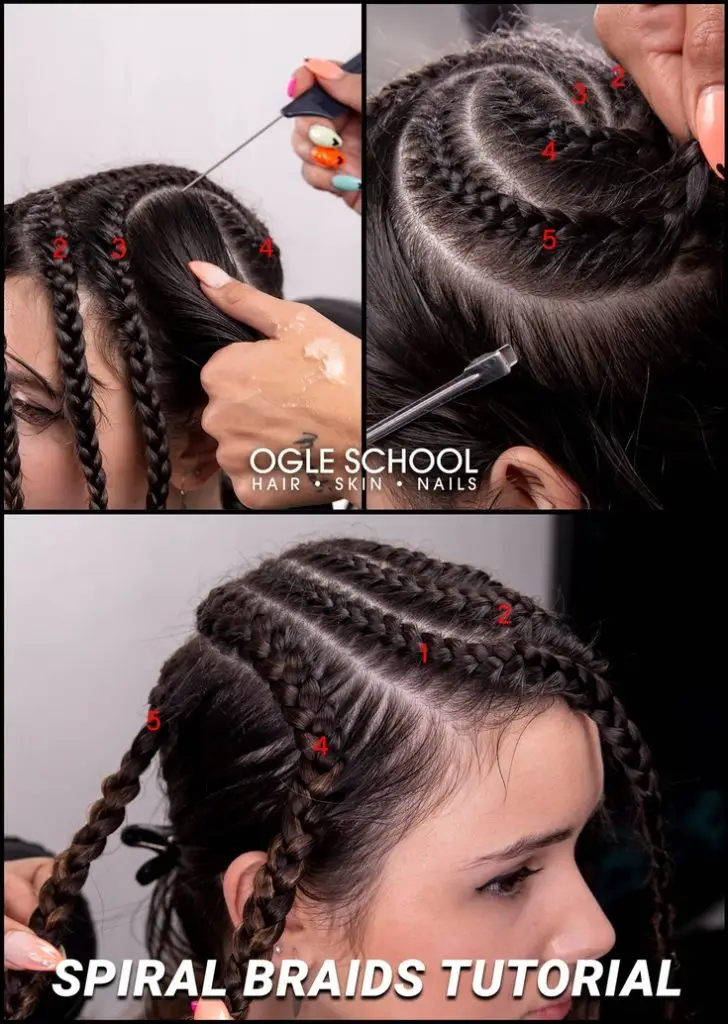
Step Eight A): Plan out the fifth braid by dividing the hair as demonstrated in the photo.
This braid will have three directions:
Straight back
Swirl at the crown going forward
Twist to the right
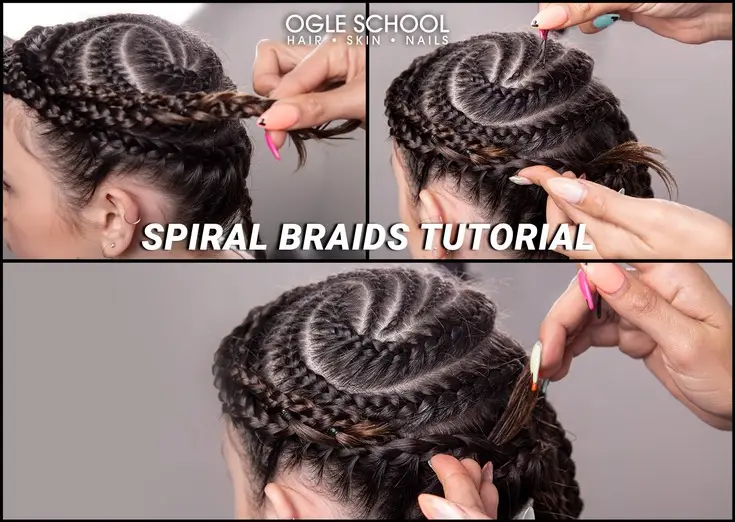
Step EightB): Make a knot and braid following the curve of the part, repeating step 3. When your braid reaches the swirl, only take hair from the left side, so the braid continues to swirl.
Step Eight C): Continue braiding parallel to braid one. When you reach the forehead, take hair only from the right side so that the braid starts to curve towards the back of the head.
Step Nine: The fifth braid should be close to the starting point of the fourth braid. Repeat step three for the fifth braid, taking hair from one side so that it follows a parallel path to the fourth braid. The fifth braid should have at least a four-finger distance from behind the ear.
Step Ten: For the sixth braid, skip the knot and instead separate three strands. Skipping the knot will allow for a wider braid. Braid the hair, collecting more hair from both sides in a straight line. The braid against the head should end 4 cm behind the right ear.
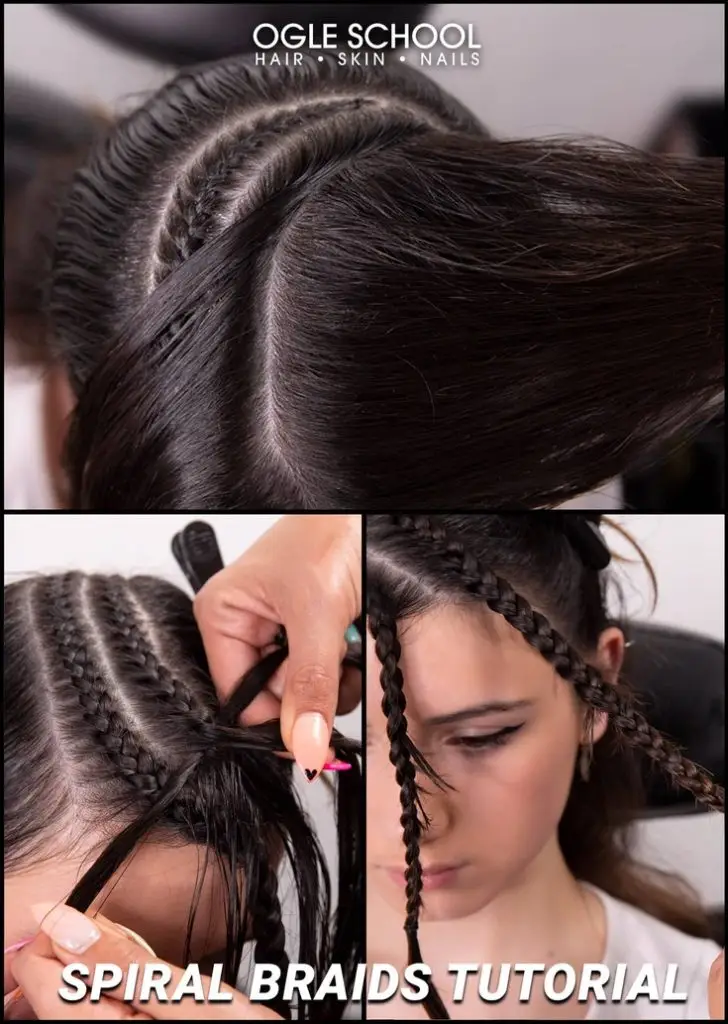
Step Eleven: Start the seventh braid by taking the remaining hair by the fifth braid, which parallels it, and braid with both sides. As the braid curves, grab only from the left side. Collect all the remaining hair from the nape of the neck.
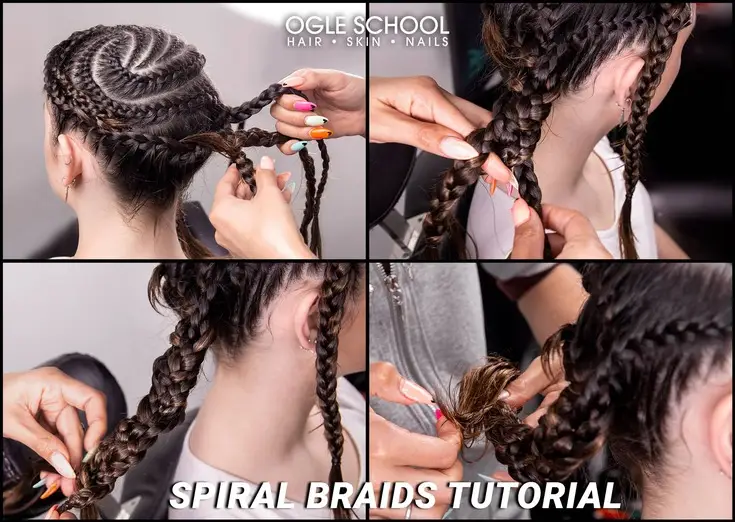
Step Twelve: Take the front three braids and secure them together with a hairpin below the seventh braid, concealing the ends.
Step Thirteen: Braid the three braids behind the right ear into a bun.
Step Fourteen: Form a bun with four, five, and six braids and secure it with hairpins.
Step Fifteen: Take the fourth braid and incorporate it into the bun, tying it with a hairpin.
There’s no style or trend too complex for Ogle School professionals to tackle! In our cosmetology course, we’ll break down each look, and you’ll get hands-on practice while our instructors guide you through every step. Visit Ogle School today to learn more about our courses!
{
“@context”: “https://schema.org/”,
“@type”: “HowTo”,
“name”: “TUTORIAL: DEMYSTIFY THE SPIRAL BRAIDS LOOK”,
“description”: “There are many steps to the spiral braids, but we simplify how to achieve every braid with each step. You’ll need a tail comb for parting each section of the braid.”,
“image”: “https://www.ogleschool.edu/wp-content/uploads/2022/10/beforeandafter.webp”,
“totalTime”: “PT120M”,
“estimatedCost”: {
“@type”: “MonetaryAmount”,
“currency”: “USD”,
“value”: “29”
},
“step”: [{
“@type”: “HowToStep”,
“text”: “Divide the hair mid-crown, combing the front half forward and the bottom half of the hair back. Secure the bottom half of the hair with a band. Next, create a new part within that section––the strand will be in an ascending spiral shape.”,
“image”: “https://www.ogleschool.edu/wp-content/uploads/2022/10/14SPIRALbraids.webp”,
“name”: “Step One”
},{
“@type”: “HowToStep”,
“text”: “Apply wax to both divisions.”,
“image”: “https://www.ogleschool.edu/wp-content/uploads/2022/10/14SPIRALbraids.webp”,
“name”: “Step Two”
},{
“@type”: “HowToStep”,
“text”: “Gather two thin strands and tie a knot. Collect the third strand and bring it to the center of the two strands. As you braid, continue gathering more hair each time you pass the hair over the center strand.”,
“image”: “https://www.ogleschool.edu/wp-content/uploads/2022/10/14SPIRALbraids.webp”,
“name”: “Step Three”
},{
“@type”: “HowToStep”,
“text”: “As you make your way to the front, collect double the amount of hair only from the left side.”,
“image”: “https://www.ogleschool.edu/wp-content/uploads/2022/10/14SPIRALbraids.webp”,
“name”: “Step Four”
},{
“@type”: “HowToStep”,
“text”: “Once you reach the forehead’s hairline, continue to braid your hair and allow it to drape over your forehead for now.”,
“image”: “https://www.ogleschool.edu/wp-content/uploads/2022/10/14SPIRALbraids.webp”,
“name”: “Step Five”
},{
“@type”: “HowToStep”,
“text”: “For the second braid, divide the hair, so it is parallel to the first braid, and leave it 1 cm apart from the first braid, and repeat the technique from step three. At the curve, continue braiding and only collect hair from the left side to create a parallel twist with the first braid.”,
“image”: “https://www.ogleschool.edu/wp-content/uploads/2022/10/14SPIRALbraids.webp”,
“name”: “Step Six”
},{
“@type”: “HowToStep”,
“text”: “Make a new part for the third braid and repeat the previous steps.”,
“image”: “https://www.ogleschool.edu/wp-content/uploads/2022/10/14SPIRALbraids.webp”,
“name”: “Step Seven”
},{
“@type”: “HowToStep”,
“text”: “Plan out the fifth braid by dividing the hair as demonstrated in the photo. This braid will have three directions:
Straight back
Swirl at the crown going forward
Twist to the right”,
“image”: “https://www.ogleschool.edu/wp-content/uploads/2022/10/14SPIRALbraids.webp”,
“name”: “Step Eight A)”
},{
“@type”: “HowToStep”,
“text”: “Make a knot and braid following the curve of the part, repeating step 3. When your braid reaches the swirl, only take hair from the left side, so the braid continues to swirl.”,
“image”: “https://www.ogleschool.edu/wp-content/uploads/2022/10/14SPIRALbraids.webp”,
“name”: “Step Eight B)”
},{
“@type”: “HowToStep”,
“text”: “Continue braiding parallel to braid one. When you reach the forehead, take hair only from the right side so that the braid starts to curve towards the back of the head.”,
“image”: “https://www.ogleschool.edu/wp-content/uploads/2022/10/14SPIRALbraids.webp”,
“name”: “Step Eight C)”
},{
“@type”: “HowToStep”,
“text”: “The fifth braid should be close to the starting point of the fourth braid. Repeat step three for the fifth braid, taking hair from one side so that it follows a parallel path to the fourth braid. The fifth braid should have at least a four-finger distance from behind the ear.”,
“image”: “https://www.ogleschool.edu/wp-content/uploads/2022/10/14SPIRALbraids.webp”,
“name”: “Step Nine”
},{
“@type”: “HowToStep”,
“text”: “For the sixth braid, skip the knot and instead separate three strands. Skipping the knot will allow for a wider braid. Braid the hair, collecting more hair from both sides in a straight line. The braid against the head should end 4 cm behind the right ear.”,
“image”: “https://www.ogleschool.edu/wp-content/uploads/2022/10/14SPIRALbraids.webp”,
“name”: “Step Ten”
},{
“@type”: “HowToStep”,
“text”: “Start the seventh braid by taking the remaining hair by the fifth braid, which parallels it, and braid with both sides. As the braid curves, grab only from the left side. Collect all the remaining hair from the nape of the neck.”,
“image”: “https://www.ogleschool.edu/wp-content/uploads/2022/10/14SPIRALbraids.webp”,
“name”: “Step Eleven”
},{
“@type”: “HowToStep”,
“text”: “Take the front three braids and secure them together with a hairpin below the seventh braid, concealing the ends.”,
“image”: “https://www.ogleschool.edu/wp-content/uploads/2022/10/14SPIRALbraids.webp”,
“name”: “Step Twelve”
},{
“@type”: “HowToStep”,
“text”: “Braid the three braids behind the right ear into a bun.”,
“image”: “https://www.ogleschool.edu/wp-content/uploads/2022/10/14SPIRALbraids.webp”,
“name”: “Step Thirteen”
},{
“@type”: “HowToStep”,
“text”: “Form a bun with four, five, and six braids and secure it with hairpins.”,
“image”: “https://www.ogleschool.edu/wp-content/uploads/2022/10/14SPIRALbraids.webp”,
“name”: “Step Fourteen”
},{
“@type”: “HowToStep”,
“text”: “Take the fourth braid and incorporate it into the bun, tying it with a hairpin.”,
“image”: “https://www.ogleschool.edu/wp-content/uploads/2022/10/14SPIRALbraids.webp”,
“name”: “Step Fifteen”
}]
}
About the Author
Jeff Chiarelli
Jeff Chiarelli is the Head of Marketing for Ogle School. His responsibilities include leading Ogle School's marketing and branding strategy to amplify Ogle School's passion for helping create future beauty professionals in the communities Ogle School serves.
A BEAUTIFUL CAREER STARTS HERE
Hi future beauty professional! We can’t wait to speak you. Fill out the form below and we’ll get you the information you need.
By submitting this form, I am providing my consent to be called, texted, and/or emailed by Ogle School at the number and/or email provided. This consent is not a condition of purchase.