On this page
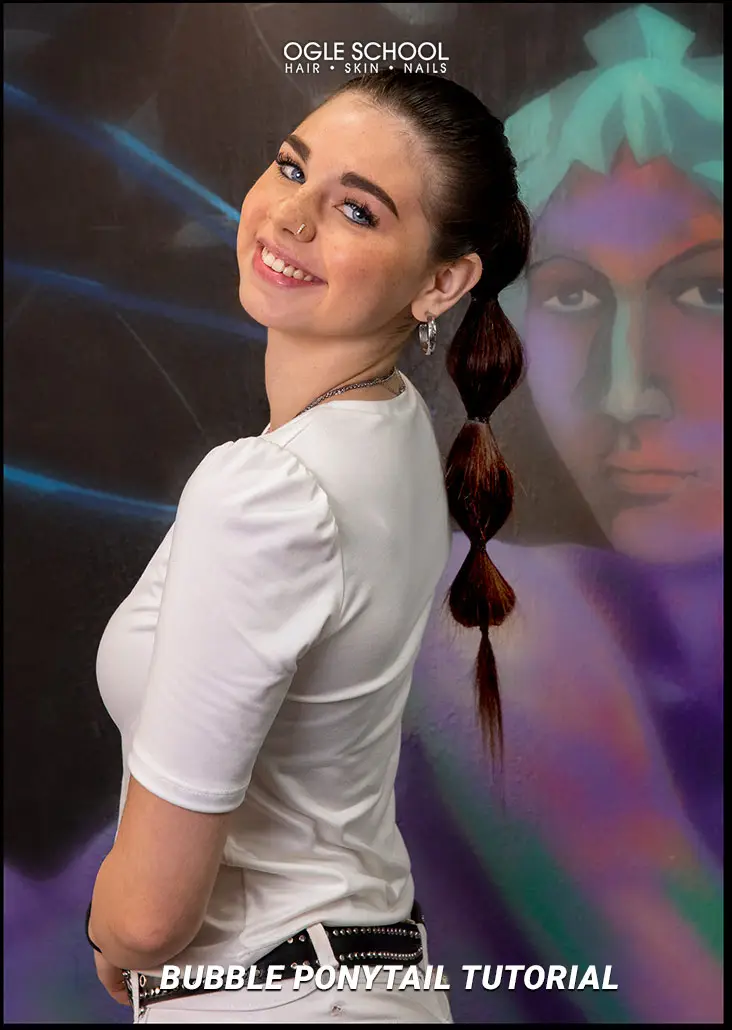
Y2K fashion trends are pervading department stores and social media. The combination of garish colors and kitsch makes this style instantly recognizable. Some quintessential, unquestionably Y2K fashion throwbacks that are making comebacks include spaghetti straps over white t-shirts, silk midi dresses, Mary Janes, scrunchies, butterfly clips, zigzag parts, and bubble ponytails. Stacy Ann Ferguson, known as Fergie, is a musician and pop star who sported the bubble ponytail in her music video, Fergalicious. The style is fun and looks best with long, cascading hair.
Tik Tok-trending bubble ponytails have been spotted on celebrities, like Halle Bailey and Issa Rae. This cute hair look is an easy revitalizing way to recreate the look and works well on virtually any hair type. It’s chic and doesn’t take itself too seriously.
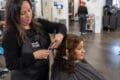
Ready to recreate your very own bubble ponytail? Follow along with these simple steps to achieve a billowing bubble ponytail style. You can start this style with dry hair or apply dry shampoo before beginning. Depending on your hair length and experience, it should take less than an hour to finish the style. Add any finishing adornments once you complete the look. Butterfly clips or bead accessories will help infuse a fun and flashy Y2K-inspired finish. To get started on the bubble ponytail tutorial, you’ll need the following materials:
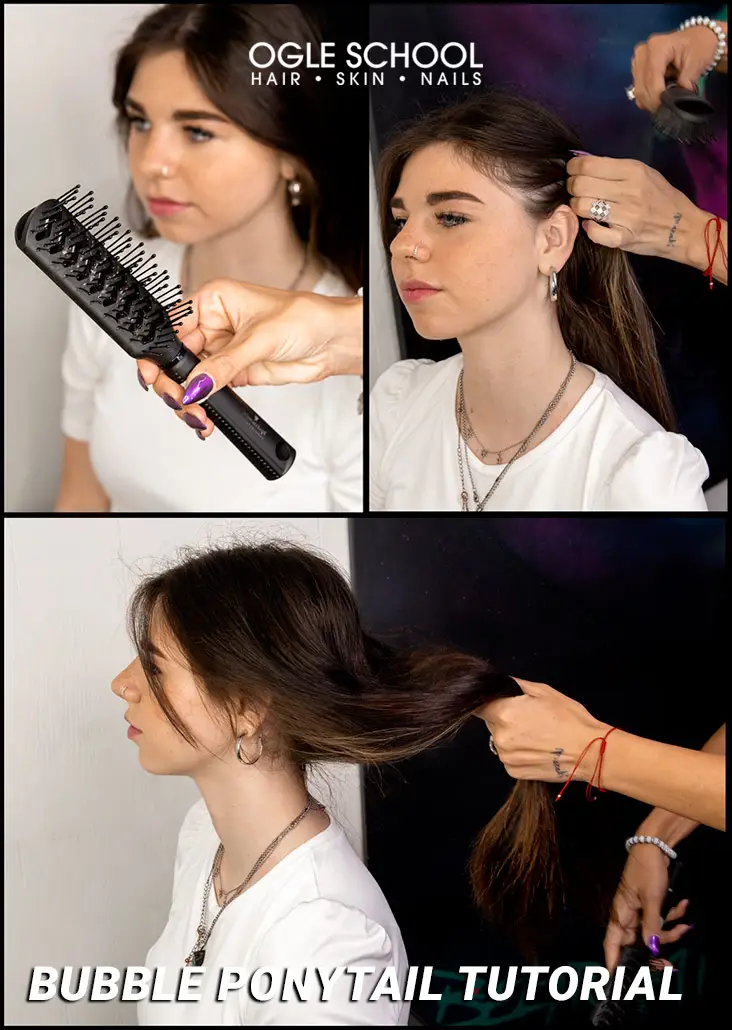
- Tail comb
- Bristle brush
- Detangling comb
- Mini Gummy elastic hairband, elastic hair ties, or your favorite hair ties
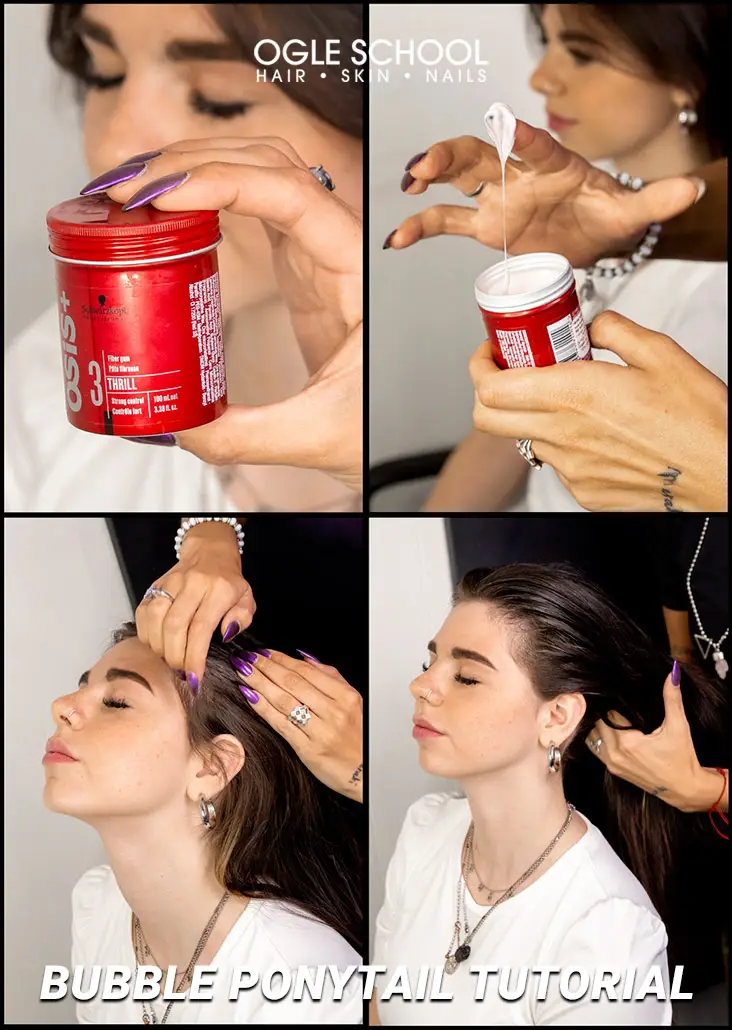
- Clear wax
- Schwarzkopf Osis Sparkler Shine Finish
- Ponytail extensions (optional)
- Bedazzled hair pins or your favorite hair accessories (optional)
Step One: Prep and Detangle Hair
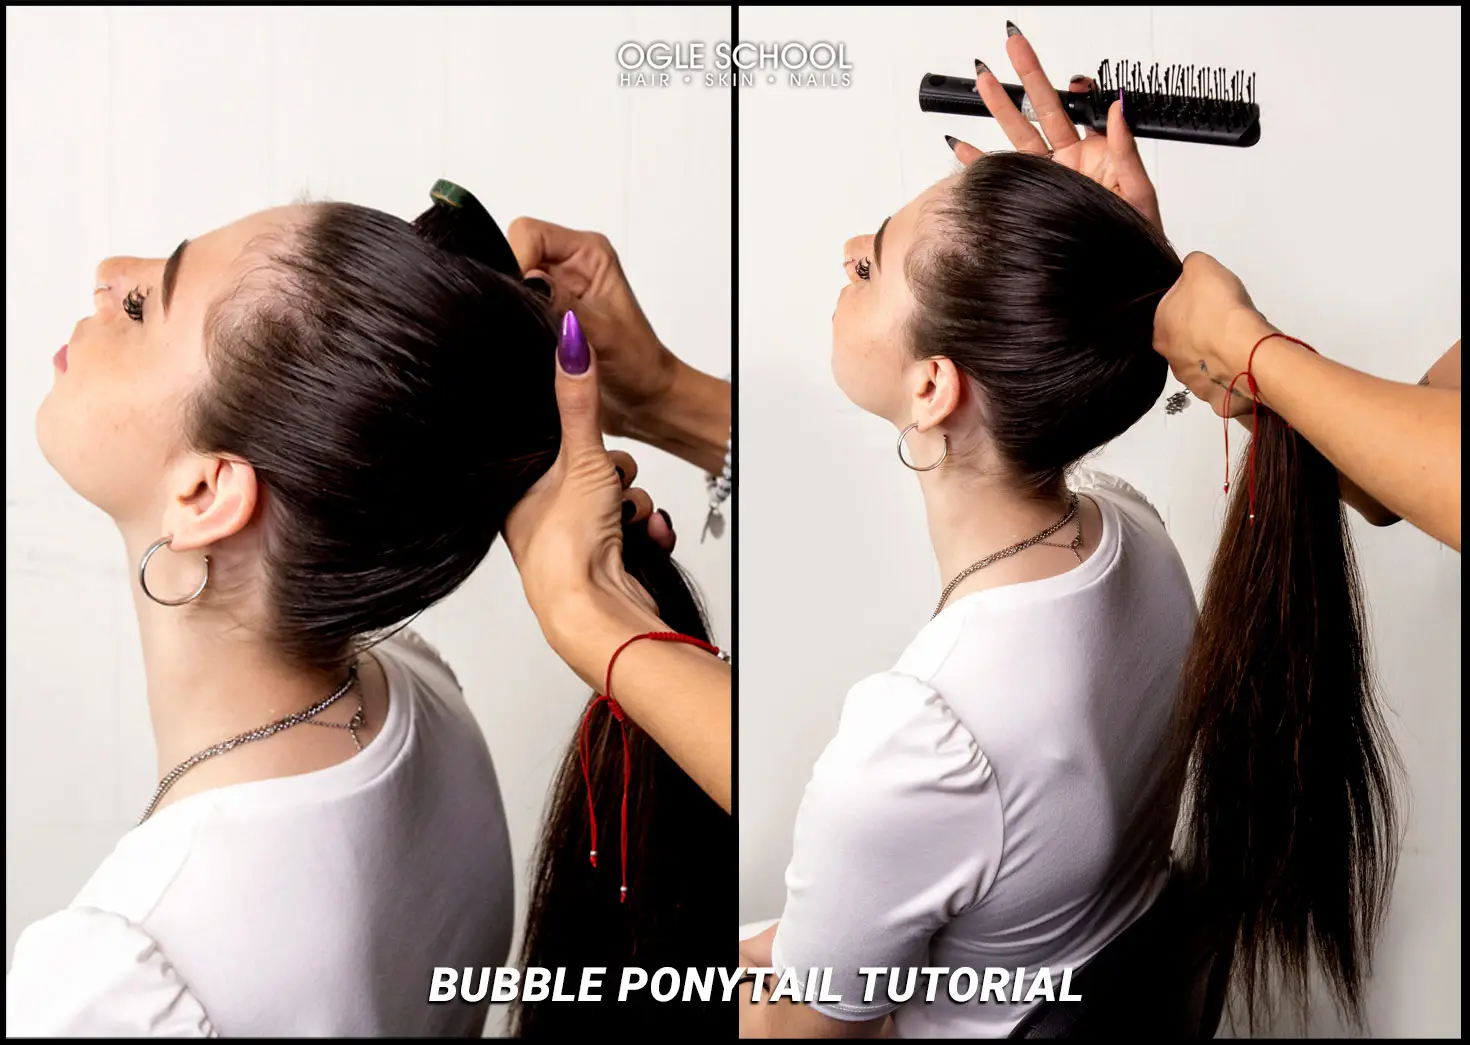
Detangle the hair with a detangling comb or brush. Start from the tips and gently work your way up to the top of the head to minimize breakage. Using a detangling product is optional.
Step Two: Massage Wax Into Hair
Apply a clear wax to the scalp and ends and massage it into the hair to add extra volume and flexibility. Adding wax will prep the hair for a voluminous, chic-looking bubble ponytail.
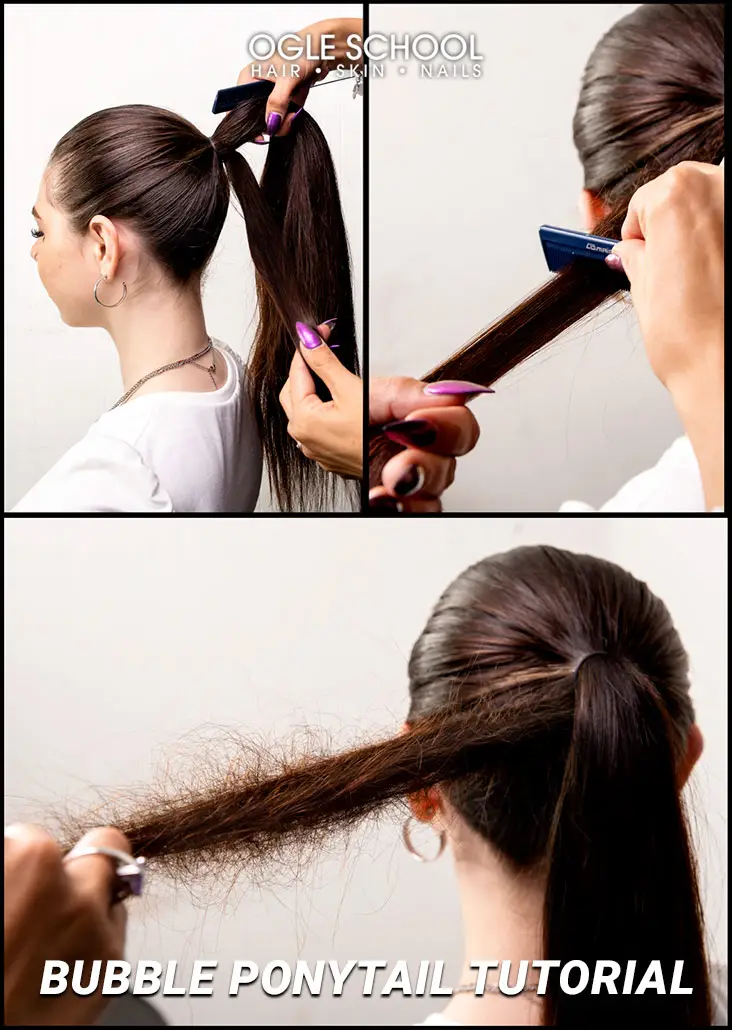
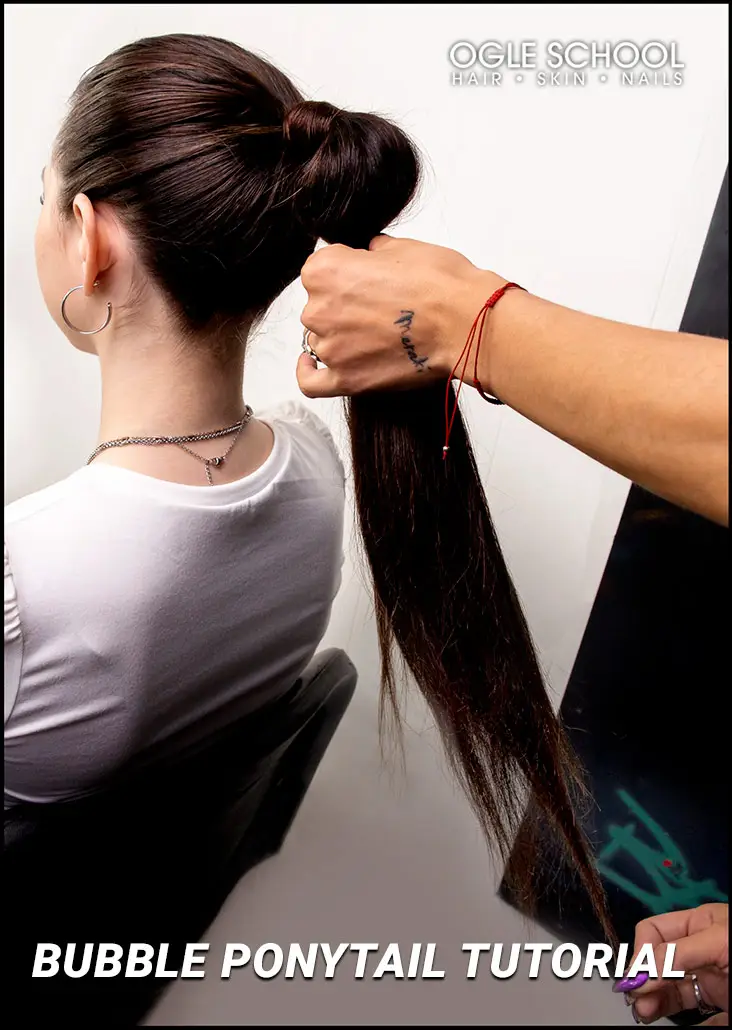
Step Three: Gather Hair Into a Ponytail
Use a brush to gather the hair into a ponytail while the model’s face faces toward the ceiling to ensure you create a smooth and even ponytail. Secure the ponytail with the first rubber band. Combing baby hairs forward is optional.
Step Four: Loop the Bobby Pin Through the Hair
Loop the bobby pin through the rubber band. Secure above it where you will put the ponytail while holding the ponytail from the bottom.
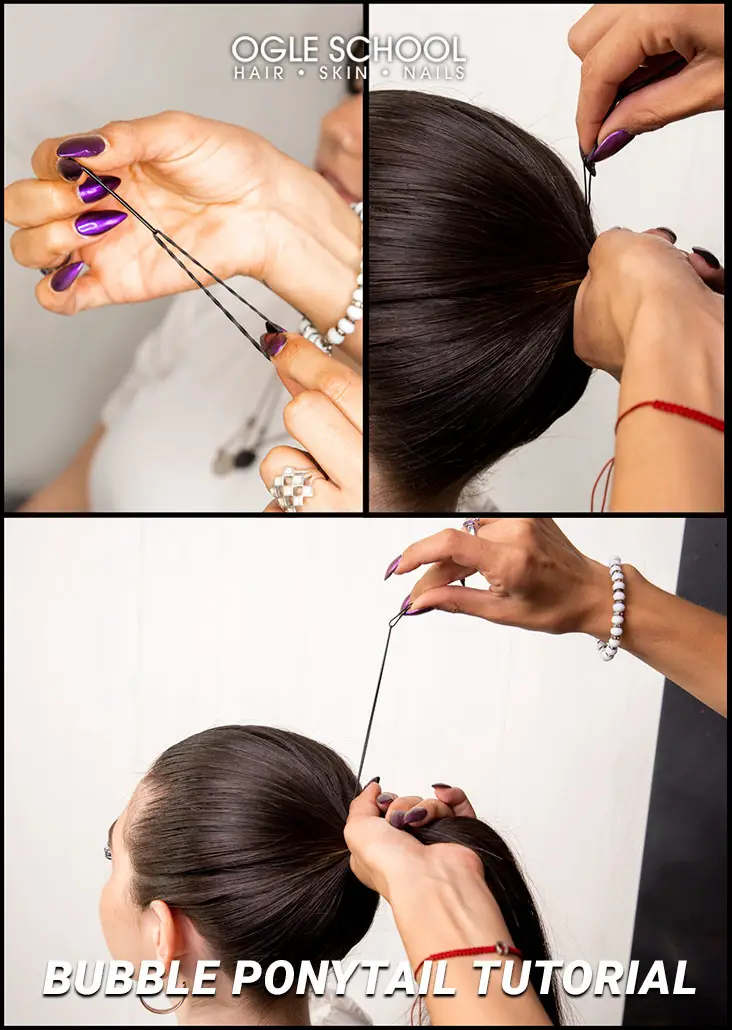
Step Five: Loop the Bobby Pin Through the Hair
Loop the second bobby pin at the bottom of the rubber band. Tie the rubber band around the ponytail. Secure the second bobby pin at the bottom of the ponytail.
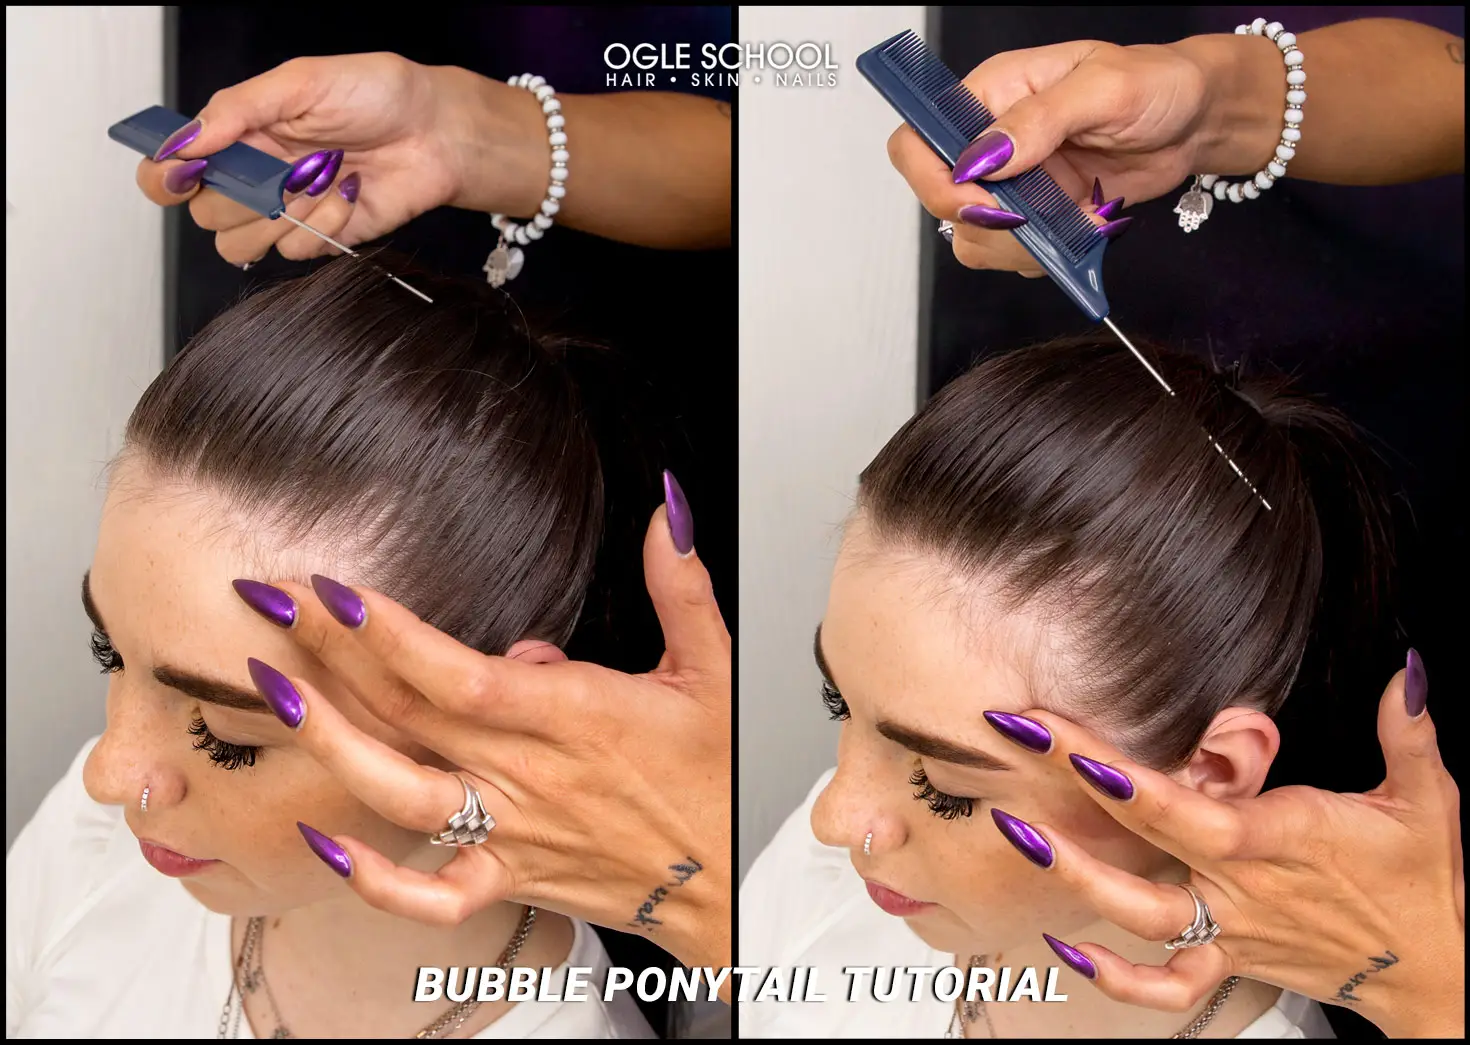
Step Six: Remove Lumps With a Tail Comb
Using a tail comb, pass the tail of the comb through the hair at the top of the head, from the front towards the ponytail’s rubber band, to ensure there are no lumps.
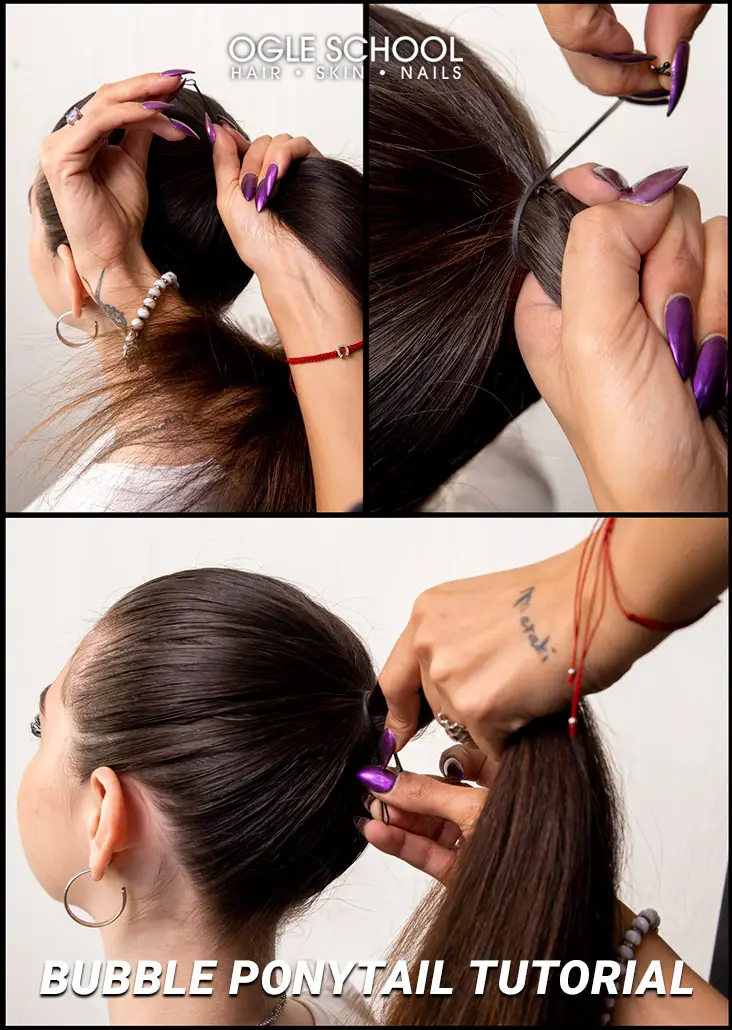
Step Seven: Separate and Tease Hair
Separate a small portion of the hair from the bottom part of the ponytail. With your tail comb, tease the bottom chunk of hair. By teasing, you’re adding texture to the hair so that it will easily wrap around the ponytail.
Note: Tease with the tail comb and smooth with the bristle brush. Boar bristle brushes help keep the hair looking shiny. This brush distributes natural oils throughout your hair. For smooth locks with a healthy-looking sheen, use a bristle brush.
Step Eight: Smooth Ponytail With Bristle Brush
Using a bristle brush will make the result of teasing bigger and help smooth the hair out. Smooth over the teased section after wrapping the hair around the ponytail. In this part, switching from a comb to a bristle brush will help add a polished look to the surface of the wrapped hair around the ponytail. You can secure the strand of hair wrapped around the ponytail with a hairpin that blends in with your natural hair color.
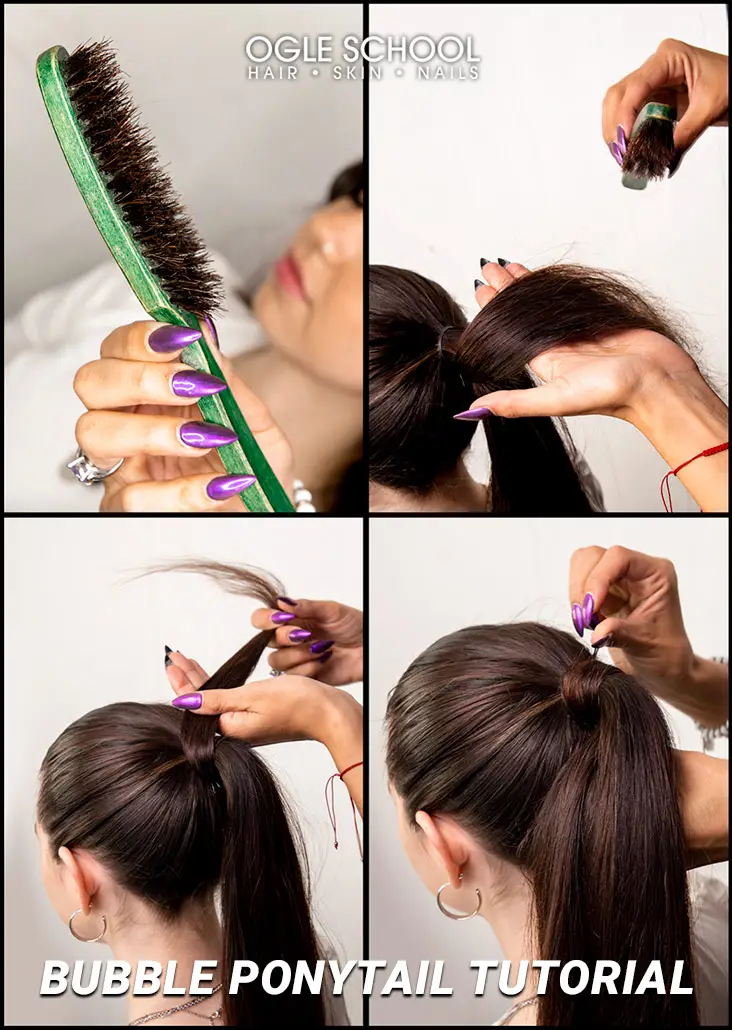
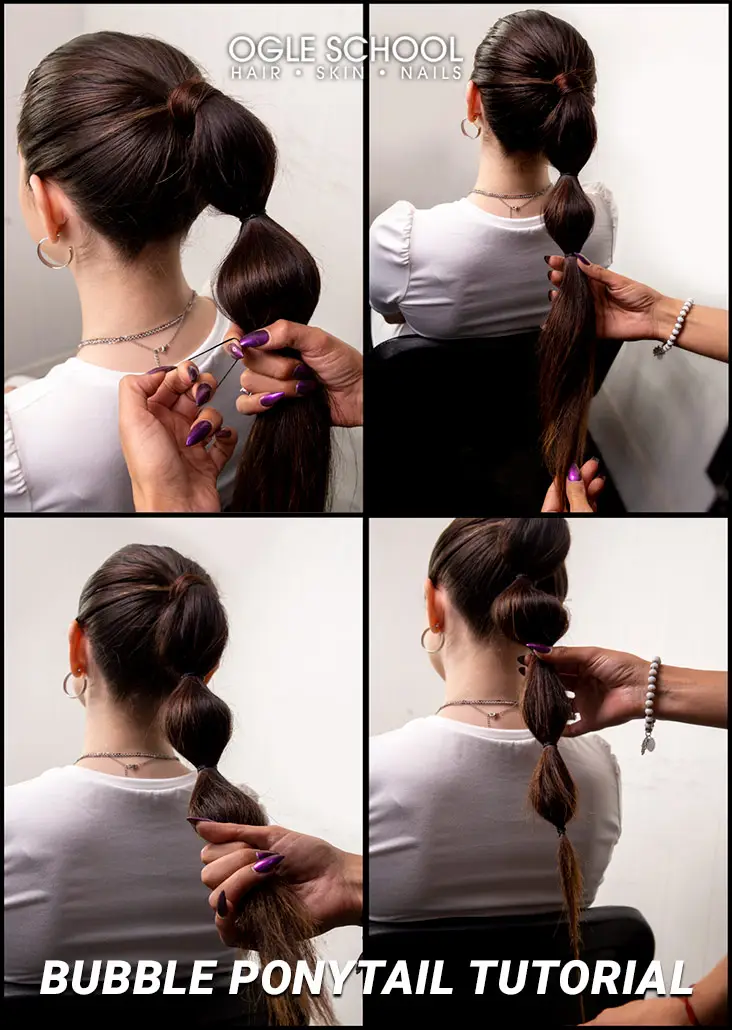
Step Nine: Separate and Tease Hair
Divide the ponytail into two sections. Lift the top half of the ponytail, and tease the hair underneath. Next, take the bottom half of the ponytail and tease the hair’s surface. Once both sections of hair have volume and are fluffed, switch to the bristle brush. Smooth and even out the outside of the ponytail.
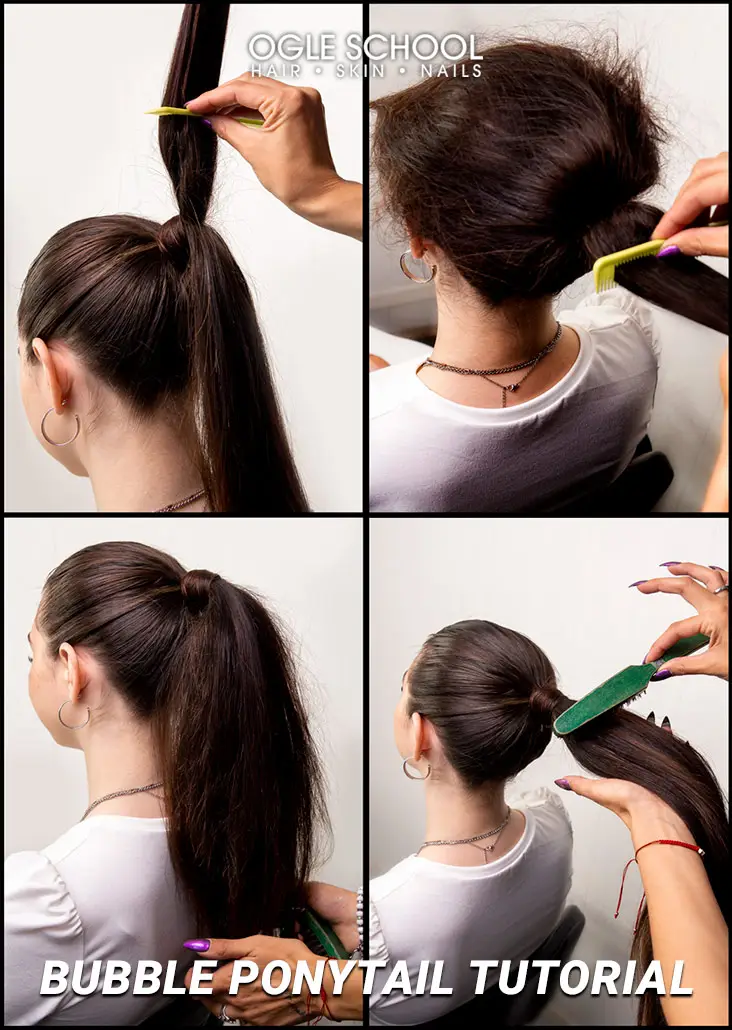
Step Ten: Begin Creating Bubble Shape
From here, we’ll begin creating the bubble effect using finite rubber bands. Leave space between each rubber band. If your hair is shorter, leave a few centimeters between each rubber band. If your hair is longer, you can opt to make larger bubbles by leaving more space.
Step Eleven: Separate and Tease Hair
Create the bubble by pinching the hair. Tie a rubber band around the hair where you want the first bubble to end. To make the bubble look rounder, select a strand of hair from the middle part of the ponytail. While holding the strand of hair, use your other hand and pinch beneath the rubberband, and pull the remaining portion of the ponytail up to create the bubble effect.
Step Twelve: Continue Creating Bubble Effects
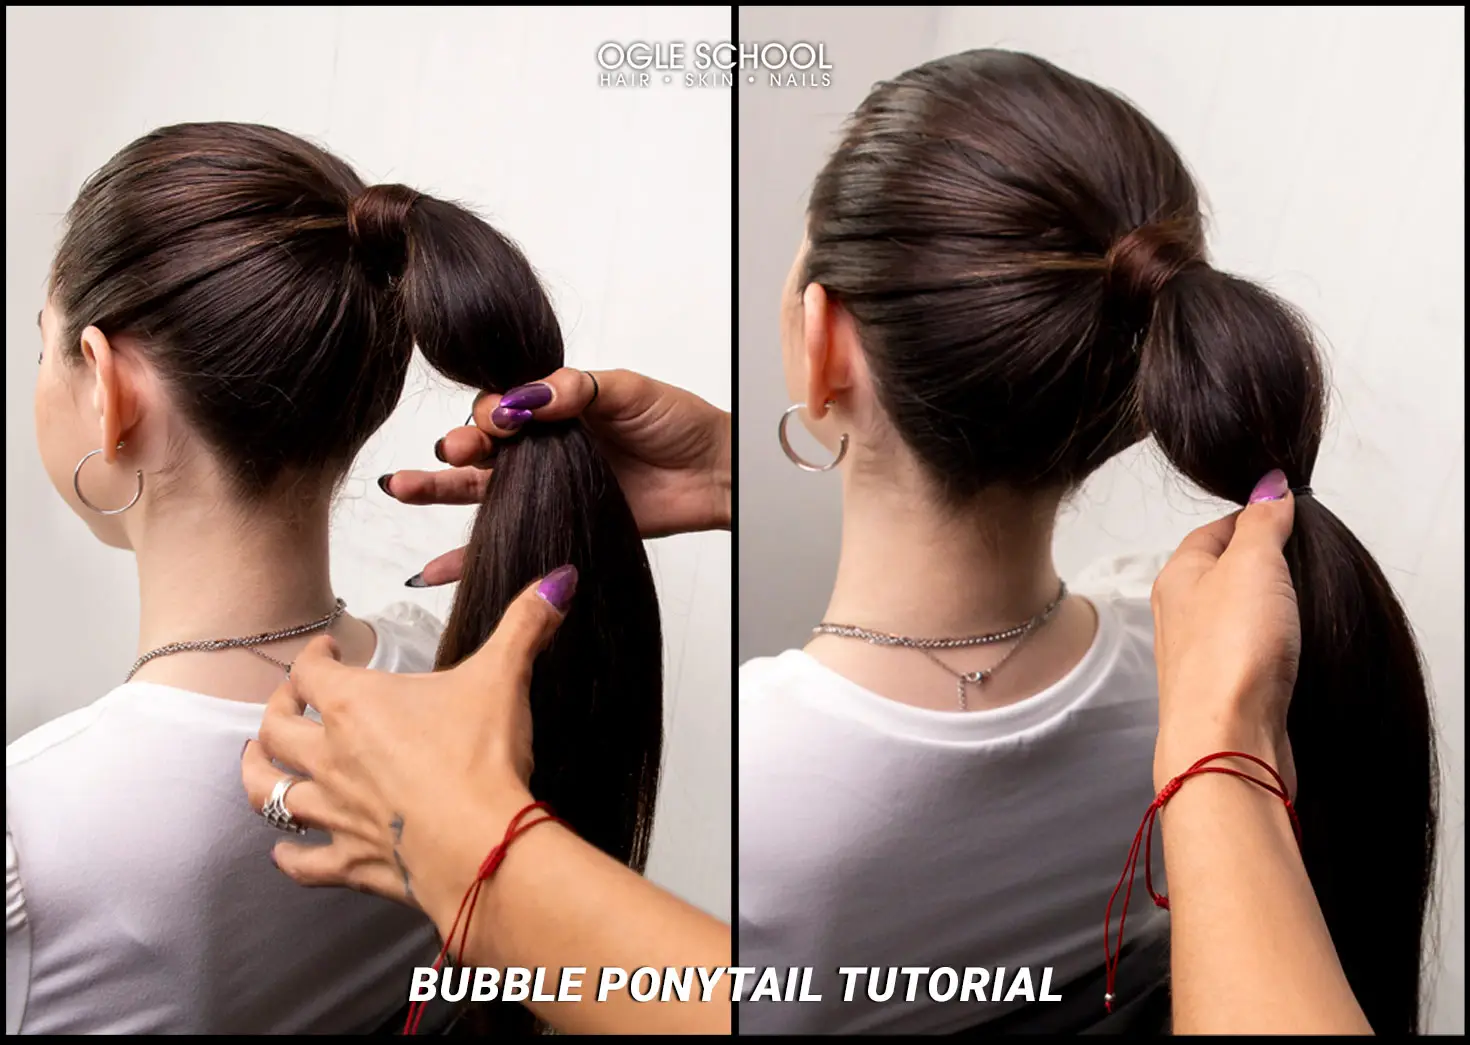
Repeat steps 10 and 11 with each bubble you create. Aim to make each bubble section look identical for a stunning and defined completed look. If the spacing of each rubberband looks off, don’t hesitate to redo a bubble section to get it right. It will make all the difference in the aesthetic.
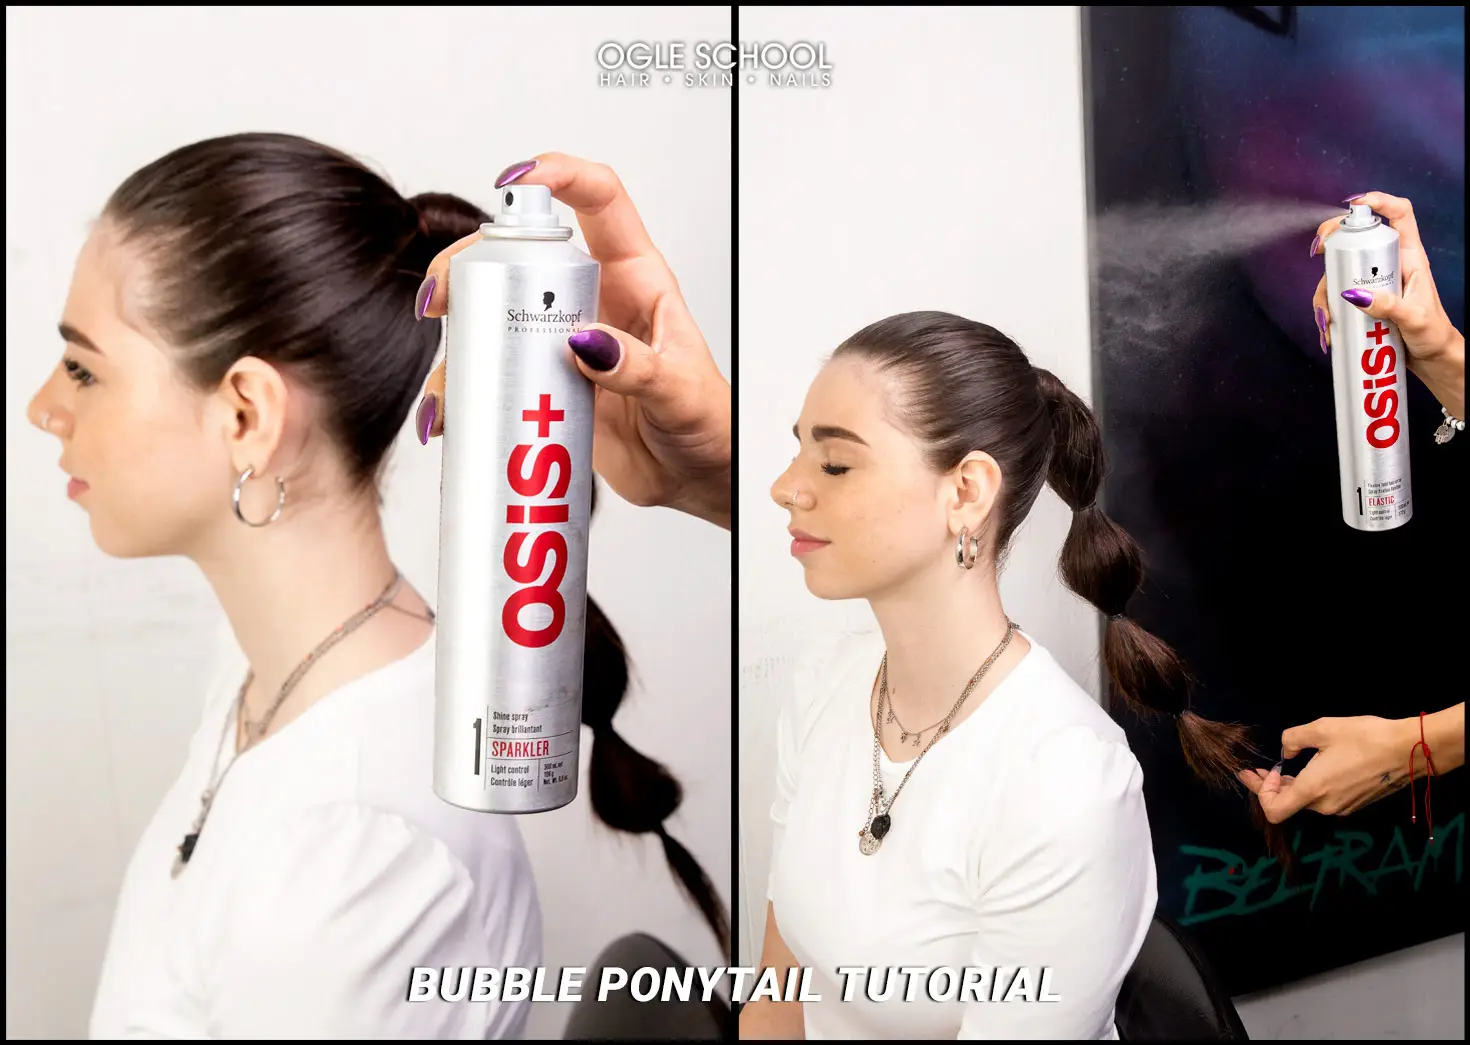
Step Thirteen: Add Finishing Touches for a Sleek Finish
Finish and polish off the look with a finishing spray. Spray bubbles with hair spray for long-lasting hold. We use Schwarzkopf Osis Sparkler Shine Finish Spray for extra shine and hold.
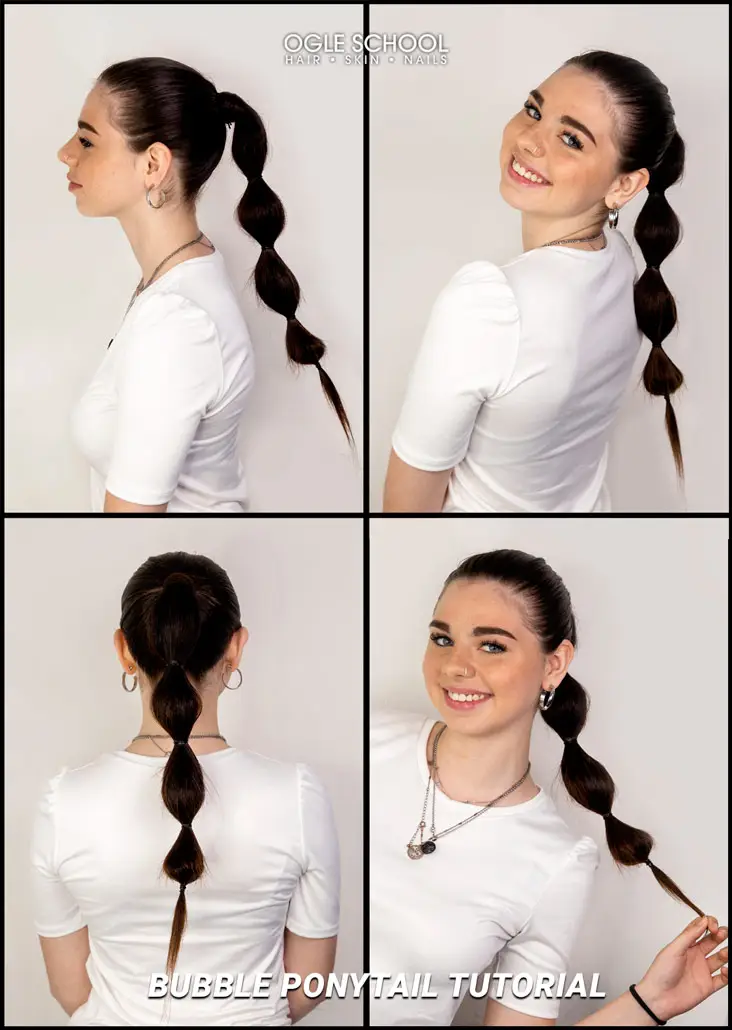
The finished look is super cute and sleek. You can pull it off for a day hair look or evening hair. It’s an easy, fun, and posh way to take your standard ponytail to a deluxe, refreshing, and unique-looking style that looks good from any angle.
This look can take up to 45 minutes for bubble ponytail rookies to achieve. If your hair is shoulder-length or shorter and you want to sport the bubble ponytail, we recommend weaving in hair extensions to pull off this style.
Do you love creating fun hairstyles? Have you considered a career in beauty or fashion? Do you stay on top of the latest and hottest fashion drops? If you want to gain a deeper understanding of cosmetology, including studying color theory, chemistry, advanced cutting, and styling techniques, request info at Ogle School.
{ “@context”: “https://schema.org/”, “@type”: “HowTo”, “name”: “LEARN HOW TO CREATE A BUBBLE PONYTAIL”, “description”: “The bubble ponytail is a fun and unique departure from the classic ponytail. In our step-by-step guide, learn how to achieve a sleek and full bubble-style ponytail.”, “image”: “https://www.ogleschool.edu/wp-content/uploads/2022/08/FINAL-copia.webp”, “totalTime”: “PT45M”, “estimatedCost”: { “@type”: “MonetaryAmount”, “currency”: “USD”, “value”: “50” }, “supply”: [{ “@type”: “HowToSupply”, “name”: “Mini Gummy elastic hairband, elastic hair ties, or your favorite hair ties” },{ “@type”: “HowToSupply”, “name”: “Clear wax” },{ “@type”: “HowToSupply”, “name”: “Schwarzkopf Osis Sparkler Shine Finish” },{ “@type”: “HowToSupply”, “name”: “Ponytail extensions (optional)” },{ “@type”: “HowToSupply”, “name”: “Bedazzled hair pins or your favorite hair accessories (optional)” }], “tool”: [{ “@type”: “HowToTool”, “name”: “Tail comb” },{ “@type”: “HowToTool”, “name”: “Bristle brush” },{ “@type”: “HowToTool”, “name”: “Detangling comb” }], “step”: [{ “@type”: “HowToStep”, “text”: “Detangle the hair with a detangling comb or brush. Start from the tips and gently work your way up to the top of the head to minimize breakage. Using a detangling product is optional.”, “image”: “https://www.ogleschool.edu/wp-content/uploads/2022/08/BUBBLEponytail-1.webp”, “name”: “STEP ONE: PREP AND DETANGLE HAIR” },{ “@type”: “HowToStep”, “text”: “Apply a clear wax to the scalp and ends and massage it into the hair to add extra volume and flexibility. Adding wax will prep the hair for a voluminous, chic-looking bubble ponytail.”, “image”: “https://www.ogleschool.edu/wp-content/uploads/2022/08/BUBBLEponytail-1.webp”, “name”: “STEP TWO: MASSAGE WAX INTO HAIR” },{ “@type”: “HowToStep”, “text”: “Use a brush to gather the hair into a ponytail while the model’s face faces toward the ceiling to ensure you create a smooth and even ponytail. Secure the ponytail with the first rubber band. Combing baby hairs forward is optional.”, “image”: “https://www.ogleschool.edu/wp-content/uploads/2022/08/BUBBLEponytail-1.webp”, “name”: “STEP THREE: GATHER HAIR INTO A PONYTAIL” },{ “@type”: “HowToStep”, “text”: “Loop the bobby pin through the rubber band. Secure above it where you will put the ponytail while holding the ponytail from the bottom.”, “image”: “https://www.ogleschool.edu/wp-content/uploads/2022/08/BUBBLEponytail-1.webp”, “name”: “STEP FOUR: LOOP THE BOBBY PIN THROUGH THE HAIR” },{ “@type”: “HowToStep”, “text”: “Loop the second bobby pin at the bottom of the rubber band. Tie the rubber band around the ponytail. Secure the second bobby pin at the bottom of the ponytail.”, “image”: “https://www.ogleschool.edu/wp-content/uploads/2022/08/BUBBLEponytail-1.webp”, “name”: “STEP FIVE: LOOP THE BOBBY PIN THROUGH THE HAIR” },{ “@type”: “HowToStep”, “text”: “Using a tail comb, pass the tail of the comb through the hair at the top of the head, from the front towards the ponytail’s rubber band, to ensure there are no lumps.”, “image”: “https://www.ogleschool.edu/wp-content/uploads/2022/08/BUBBLEponytail-1.webp”, “name”: “STEP SIX: REMOVE LUMPS WITH A TAIL COMB” },{ “@type”: “HowToStep”, “text”: “Separate a small portion of the hair from the bottom part of the ponytail. With your tail comb, tease the bottom chunk of hair. By teasing, you’re adding texture to the hair so that it will easily wrap around the ponytail.Note: Tease with the tail comb and smooth with the bristle brush. Boar bristle brushes help keep the hair looking shiny. This brush distributes natural oils throughout your hair. For smooth locks with a healthy-looking sheen, use a bristle brush.”, “image”: “https://www.ogleschool.edu/wp-content/uploads/2022/08/BUBBLEponytail-1.webp”, “name”: “STEP SEVEN: SEPARATE AND TEASE HAIR” },{ “@type”: “HowToStep”, “text”: “Using a bristle brush will make the result of teasing bigger and help smooth the hair out. Smooth over the teased section after wrapping the hair around the ponytail. In this part, switching from a comb to a bristle brush will help add a polished look to the surface of the wrapped hair around the ponytail. You can secure the strand of hair wrapped around the ponytail with a hairpin that blends in with your natural hair color.”, “image”: “https://www.ogleschool.edu/wp-content/uploads/2022/08/BUBBLEponytail-1.webp”, “name”: “STEP EIGHT: SMOOTH PONYTAIL WITH BRISTLE BRUSH” },{ “@type”: “HowToStep”, “text”: “Divide the ponytail into two sections. Lift the top half of the ponytail, and tease the hair underneath. Next, take the bottom half of the ponytail and tease the hair’s surface. Once both sections of hair have volume and are fluffed, switch to the bristle brush. Smooth and even out the outside of the ponytail.”, “image”: “https://www.ogleschool.edu/wp-content/uploads/2022/08/BUBBLEponytail-1.webp”, “name”: “STEP NINE: SEPARATE AND TEASE HAIR” },{ “@type”: “HowToStep”, “text”: “From here, we’ll begin creating the bubble effect using finite rubber bands. Leave space between each rubber band. If your hair is shorter, leave a few centimeters between each rubber band. If your hair is longer, you can opt to make larger bubbles by leaving more space.”, “image”: “https://www.ogleschool.edu/wp-content/uploads/2022/08/BUBBLEponytail-1.webp”, “name”: “STEP TEN: BEGIN CREATING BUBBLE SHAPE” },{ “@type”: “HowToStep”, “text”: “Create the bubble by pinching the hair. Tie a rubber band around the hair where you want the first bubble to end. To make the bubble look rounder, select a strand of hair from the middle part of the ponytail. While holding the strand of hair, use your other hand and pinch beneath the rubberband, and pull the remaining portion of the ponytail up to create the bubble effect.”, “image”: “https://www.ogleschool.edu/wp-content/uploads/2022/08/BUBBLEponytail-1.webp”, “name”: “STEP ELEVEN: SEPARATE AND TEASE HAIR” },{ “@type”: “HowToStep”, “text”: “Repeat steps 10 and 11 with each bubble you create. Aim to make each bubble section look identical for a stunning and defined completed look. If the spacing of each rubberband looks off, don’t hesitate to redo a bubble section to get it right. It will make all the difference in the aesthetic.”, “image”: “https://www.ogleschool.edu/wp-content/uploads/2022/08/BUBBLEponytail-1.webp”, “name”: “STEP TWELVE: CONTINUE CREATING BUBBLE EFFECTS” },{ “@type”: “HowToStep”, “text”: “Finish and polish off the look with a finishing spray. Spray bubbles with hair spray for long-lasting hold. We use Schwarzkopf Osis Sparkler Shine Finish Spray for extra shine and hold.”, “image”: “https://www.ogleschool.edu/wp-content/uploads/2022/08/BUBBLEponytail-1.webp”, “name”: “STEP THIRTEEN: ADD FINISHING TOUCHES FOR A SLEEK FINISH” }] }